Airbnb Before and After: Budget Makeover, No Renovation
No wall moved in this makeover. No floor was replaced, no window touched, and the angled staircase still cuts across the room the way it always has. The before and after share the same shell: same laminate, same white paint, same tall windows. Everything that changed is furniture, textiles, lighting, plants, and styling.
The apartment is a compact top-floor rental with an open living and dining room, listed for short-term stays. The host is a returning client: I had already designed an Airbnb for them on a modest budget, and this was the next one. They wanted it to feel worth booking without construction or a renovation budget. So I treated the shell as fixed and put everything into the layers that sit on top of it.
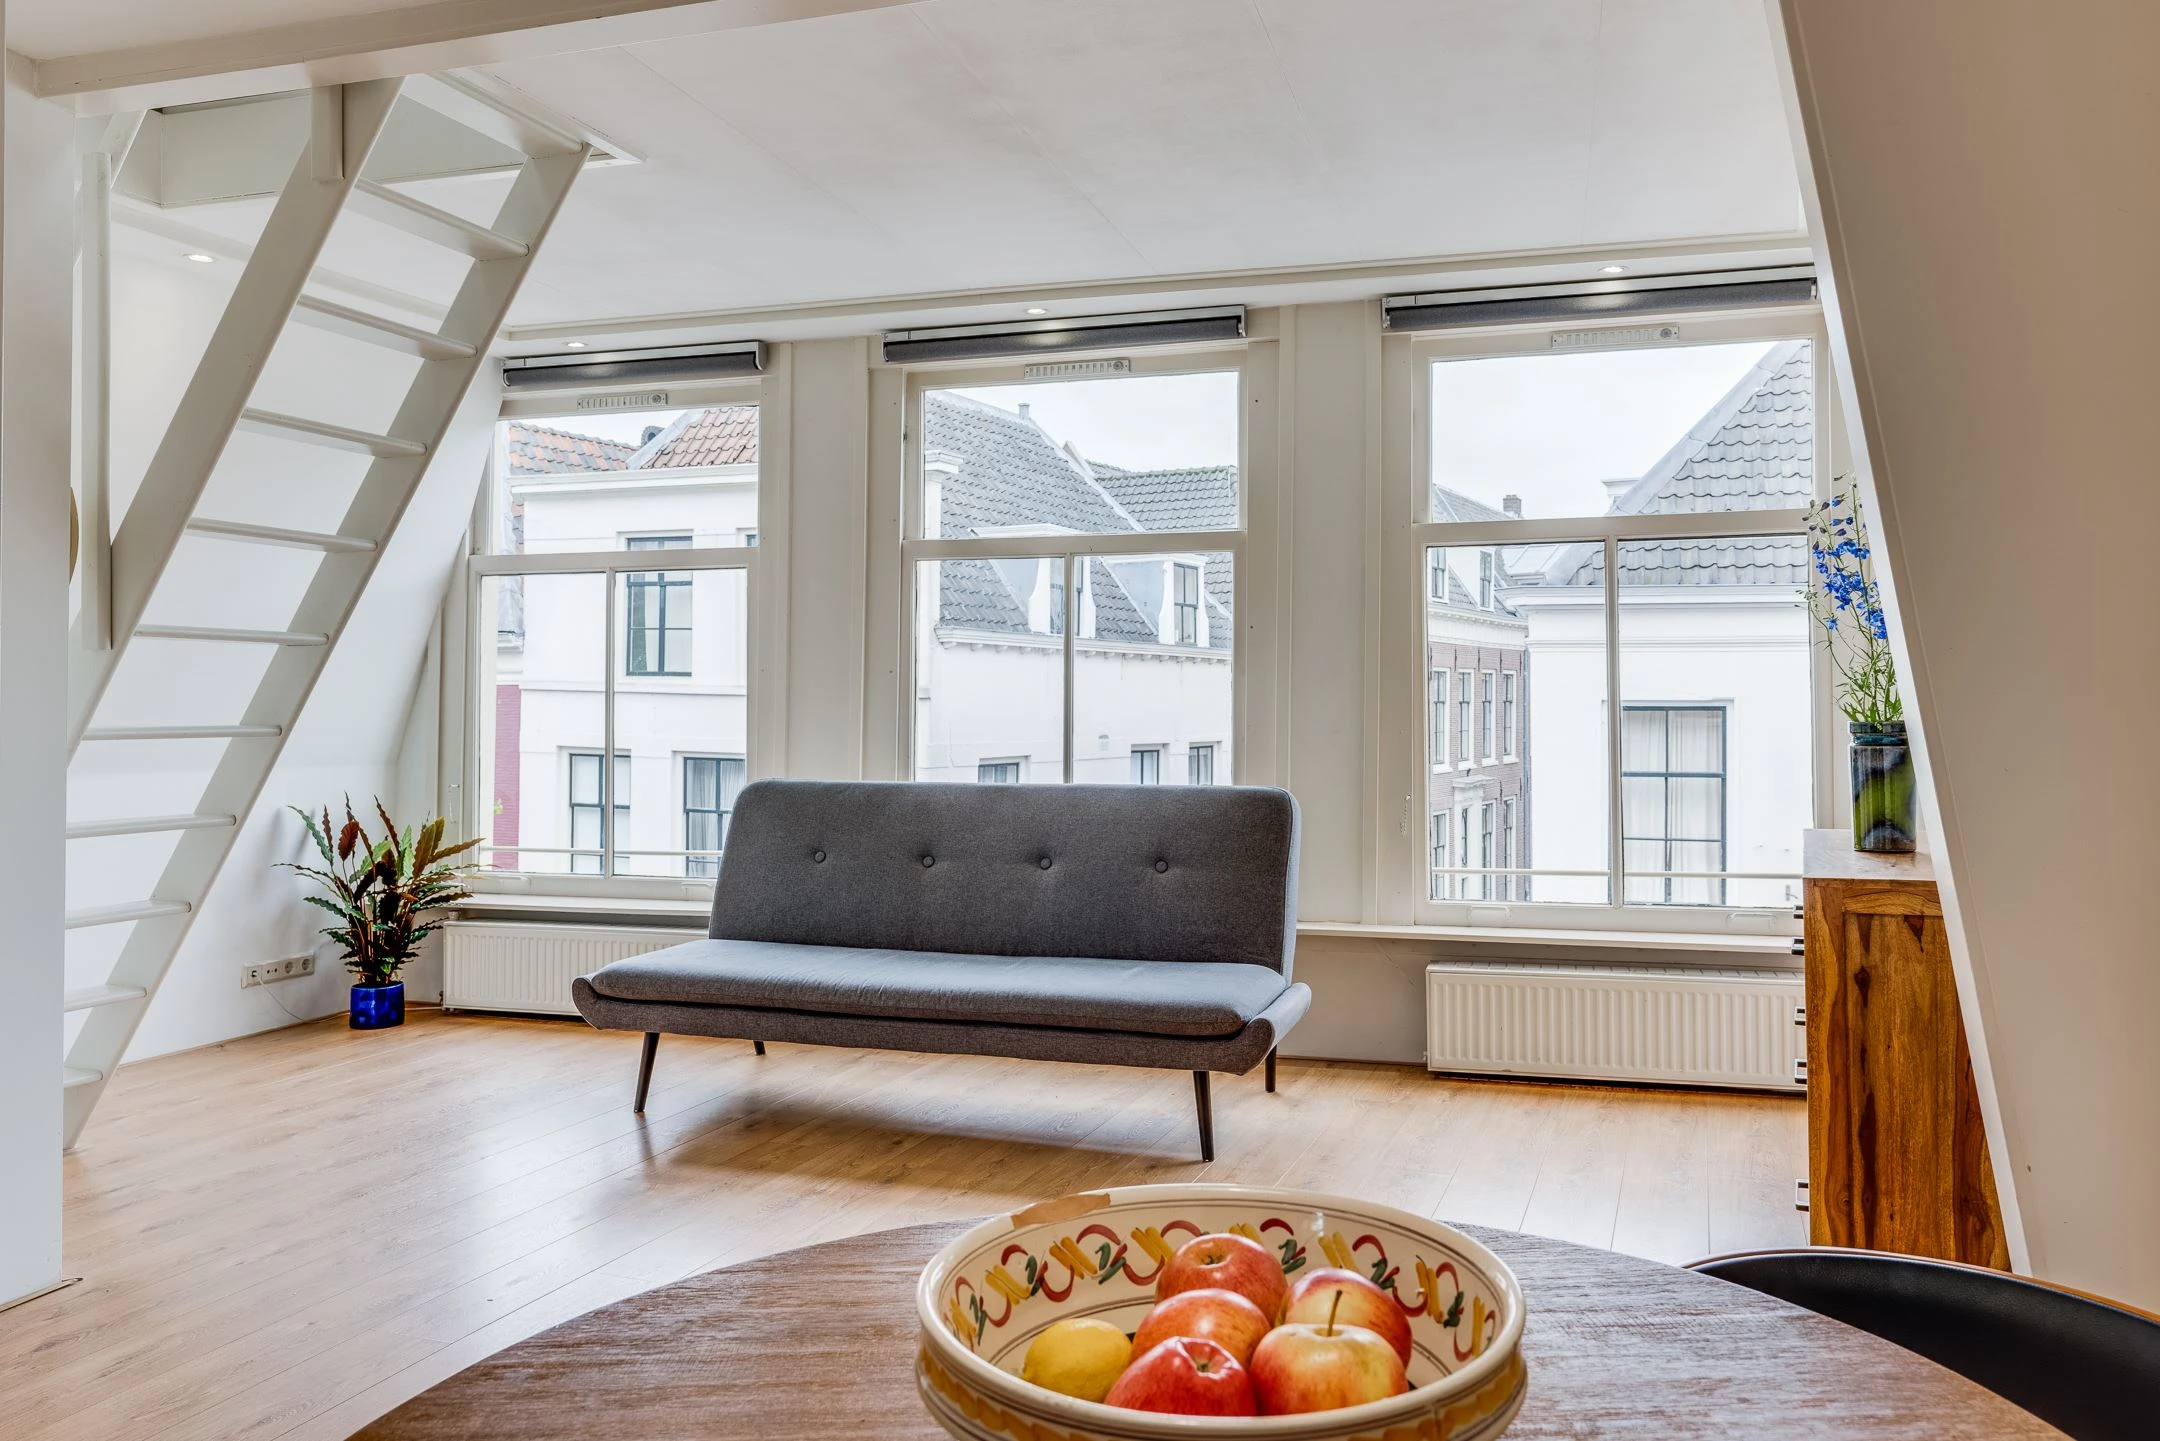
What This Airbnb Living Room Looked Like Before
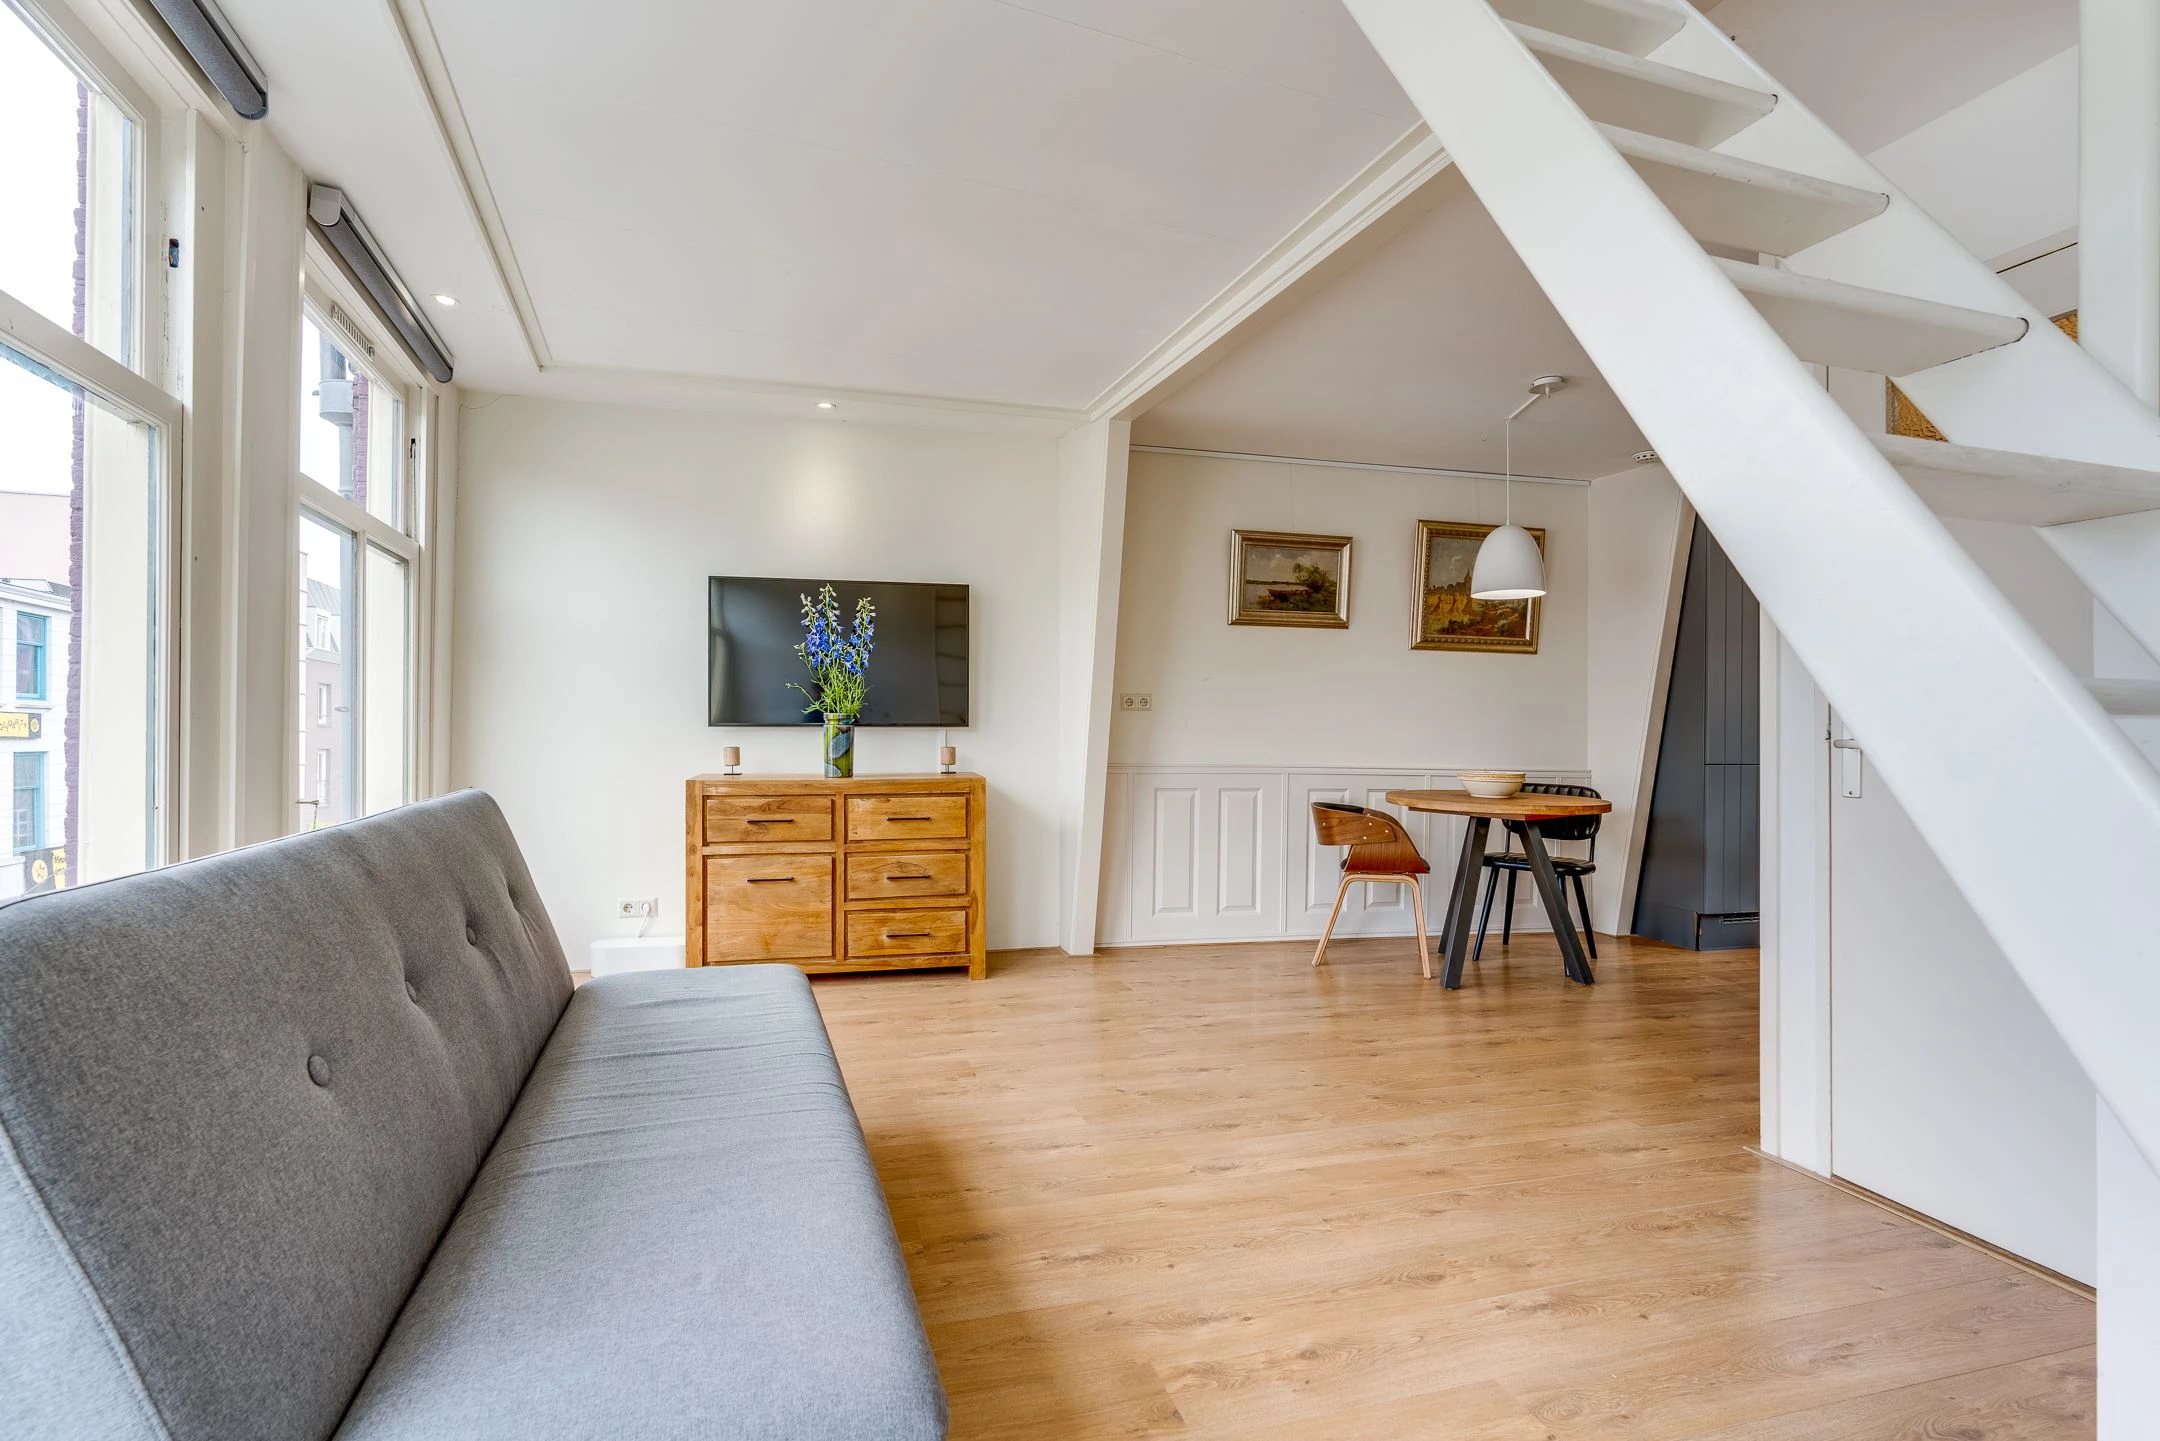
Clean, neutral, and forgettable. A gray sofa bed sat alone against the window wall. A television hung over a small wood dresser. The laminate ran bare from the dining nook to the windows, the dining chairs did not match, and a pair of small framed paintings did their best to disappear into the nook wall.
None of it was broken. So many short-term rentals look like this, because neutral and empty feels safe to a host. But in a listing, neutral and empty is not safe. It is invisible. Guests scroll photos and book a feeling, and a bare room photographs as unloved even when it is spotless. The camera cannot tell minimal from abandoned, and neither can a guest comparing listings in the scroll.
So the brief I set myself was simple: keep the shell exactly as it is, and change the feeling entirely.
Keep the Bones, Change the Layers
The bones here were genuinely good: tall windows, generous daylight, pale floors, an open plan connecting the seating area to the dining nook. When the bones work, spending on them is the fastest way to waste a budget. Every decision in this project lives in the layers instead: sofa, rug, lighting, plants, and the objects that make a shelf worth photographing.
Before I bought a single piece, I spent a long while with the host's photos, following where the daylight lands on that laminate, because the light decides where the seating wants to live. It confirmed the window wall could carry the whole seating group. The budget went into the pieces themselves, not into rearranging the room. I have written separately about the layers that make a living room feel finished, and this project is that idea under budget pressure: the same layers, chosen once, doing the work a renovation would have attempted at far greater cost.
Does that make sense so far? The shell earns nothing in a listing photo. The layers earn everything.
What Changed, Piece by Piece
The sofa led. The gray sofa bed gave way to a mustard velvet sofa, and I admit mustard made me nervous on paper. That one swap changed what the room is about: it is the color anchor, the thing your eye lands on in the listing photo and from the doorway alike. A sofa is also the easiest place for a restyle to go wrong. Why a new sofa can look wrong in a room is its own subject; the short version is that the piece must be chosen for the room it is entering, not the showroom it is leaving.
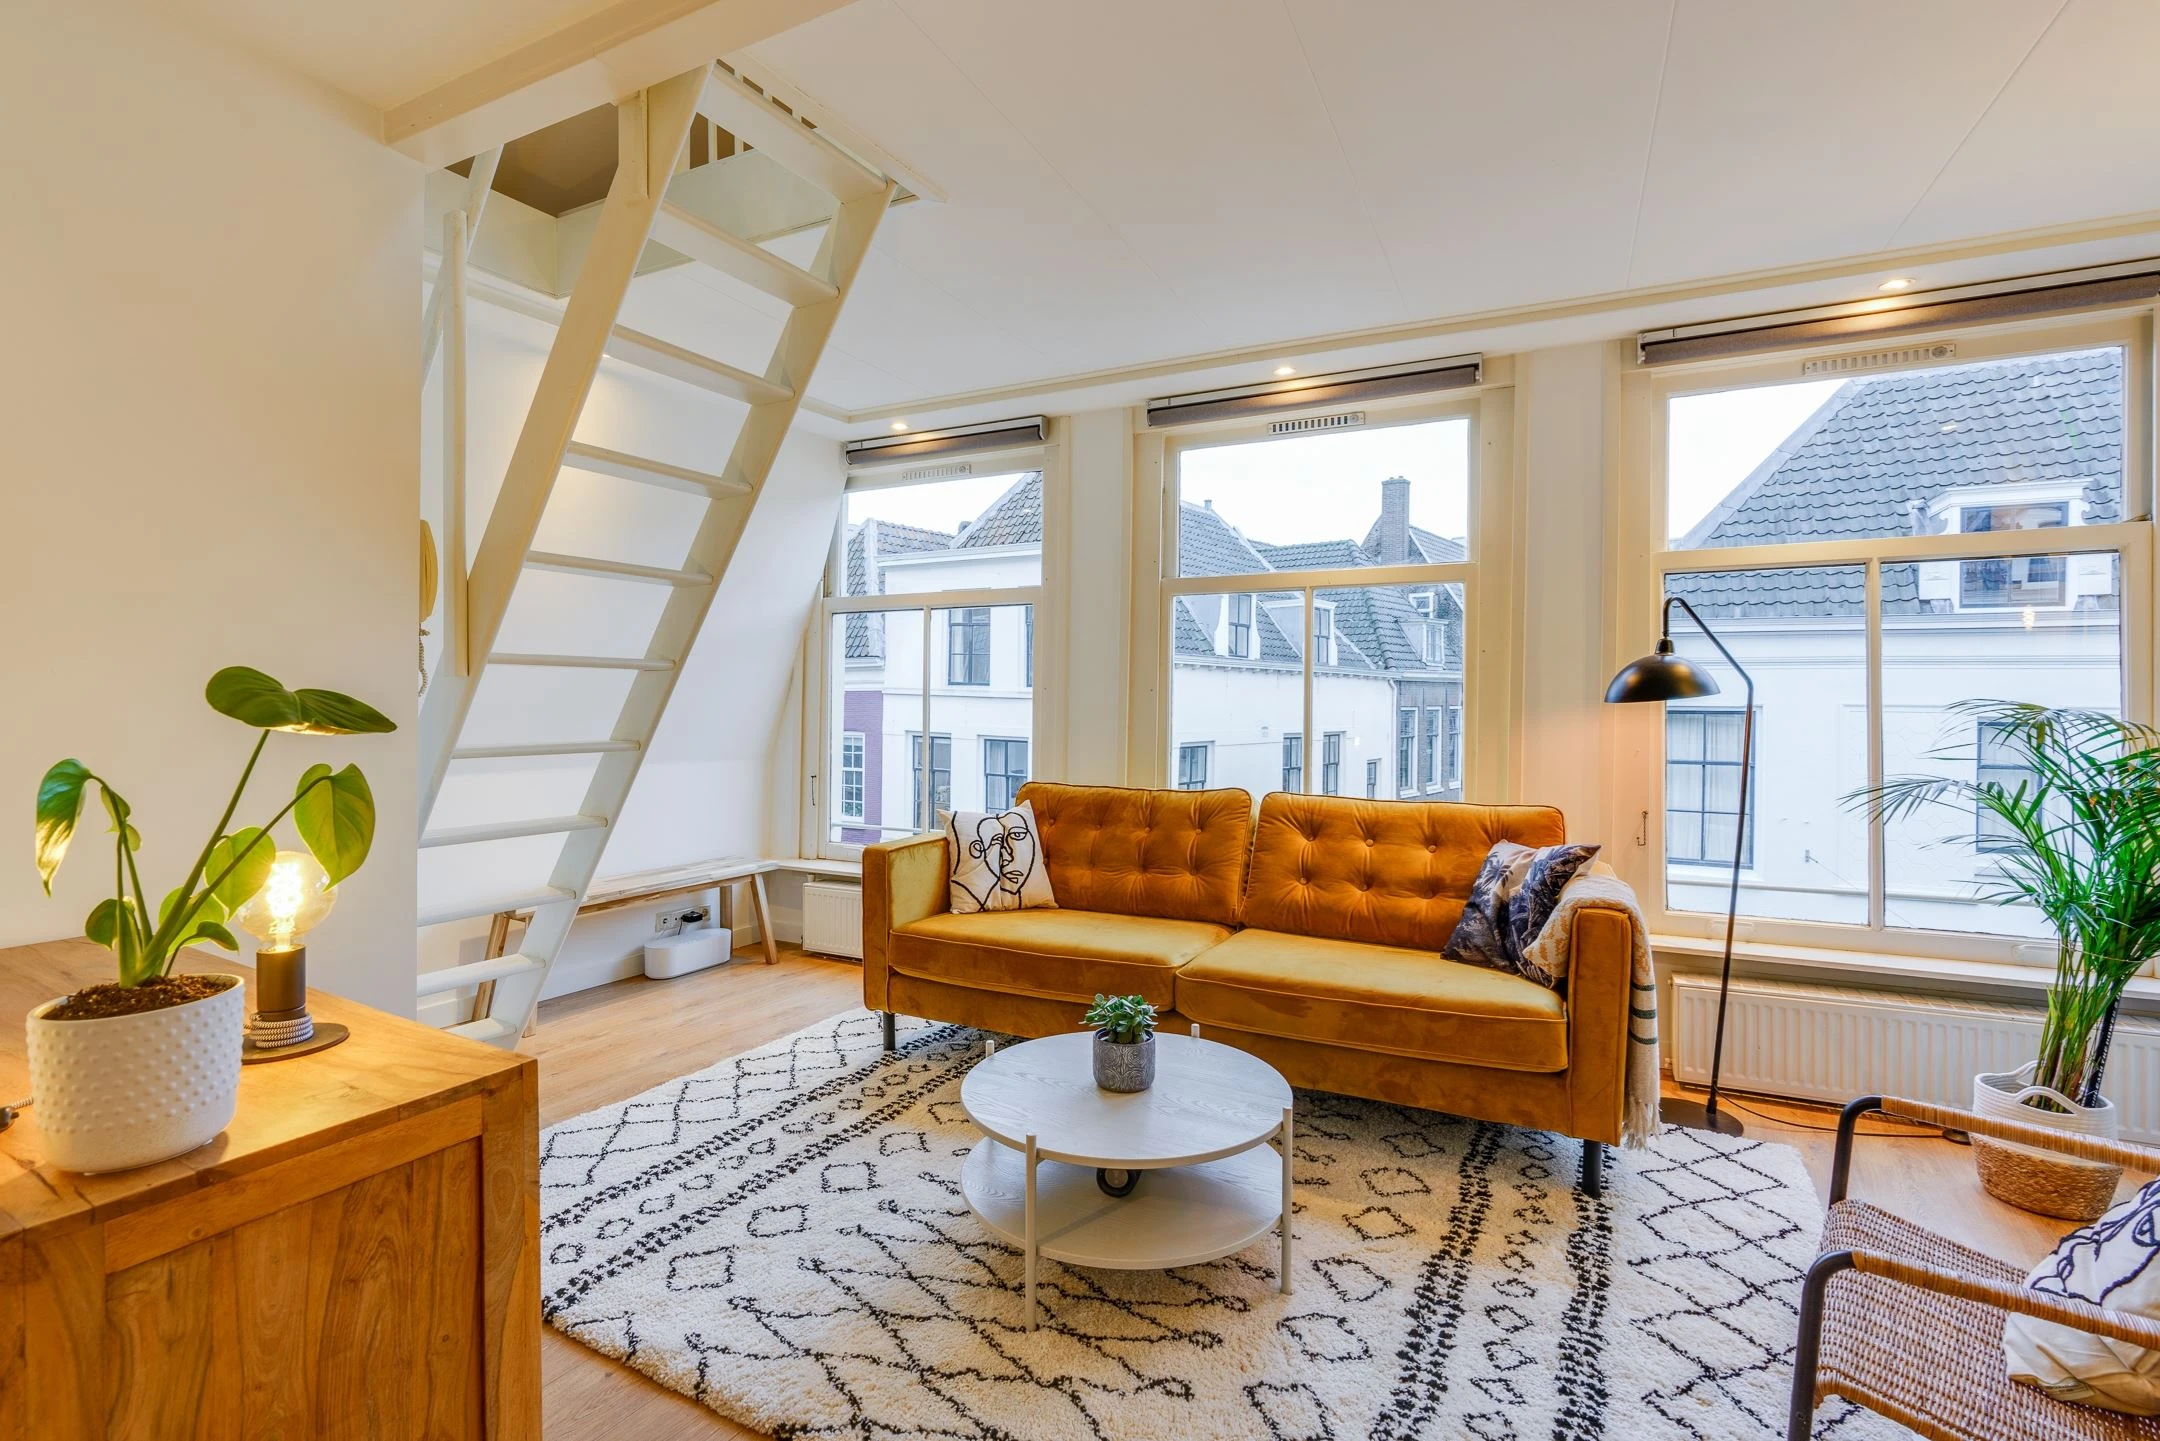
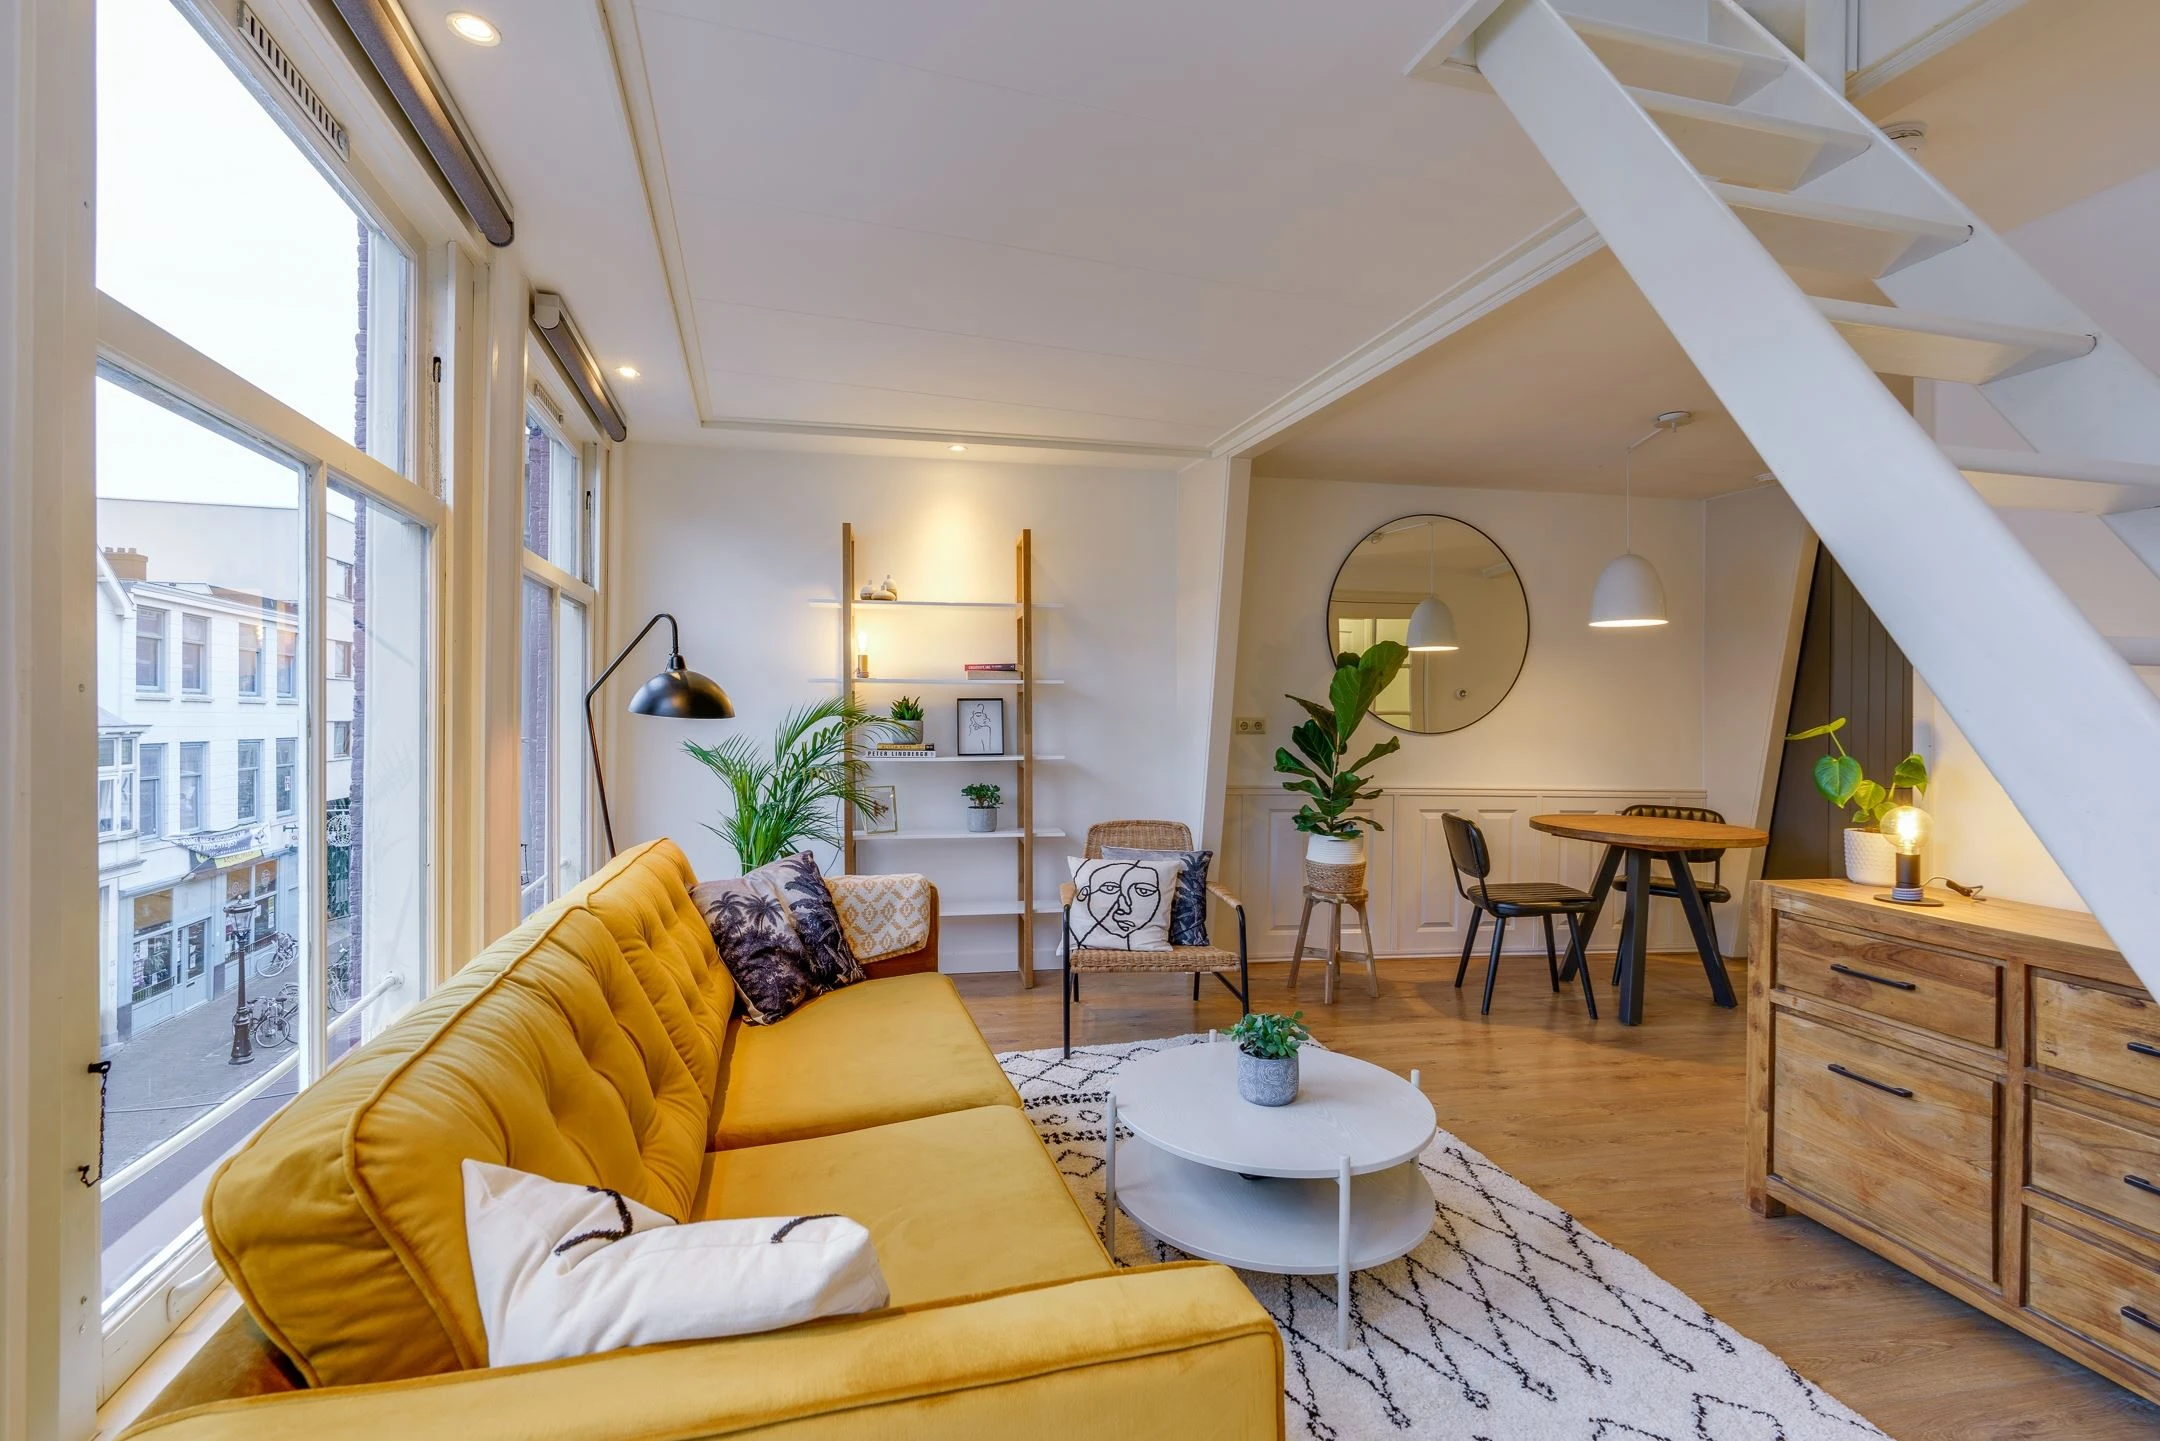
Beneath it, the bare floor gained a cream Berber-style patterned rug that anchors the seating area and gives the pale laminate somewhere to stop. Lighting came in layers: a black arc floor lamp curving over the sofa, and a small exposed-bulb lamp on the wood sideboard, so the room now has warm light below the ceiling.
The wall that held the television above a small dresser now holds an open ladder shelf styled with books, small plants, and framed art. In the dining nook, the pair of small paintings came down and a large round mirror went up, bouncing window light back across the table. The mismatched dining chairs became a matching black pair. A rattan accent chair joined the seating area, and patterned pillows and a throw softened it all.
Plants went wherever the light allowed: a fiddle leaf fig by the dining nook, a palm at the window, greenery along the shelf. Every piece on that list is movable, and that list is the entire transformation. When the host saw the after photos, the message back was basically a wall of exclamation points.
Styling an Airbnb Living Room for the Listing Photos
I styled this room for the camera as deliberately as for the guest, because the listing photo is the front door. No guest walks past your actual door before booking; they walk past your photos. So the mirror sits where it catches the light, the throw is draped the way it should look in the frame, the shelf is arranged in small vignettes that still read at thumbnail size, and something in almost every shot is alive.
Color carries the heaviest load, and every color that matters in the after photos arrived with the makeover. Here is the palette, sampled straight from those photos.
The After Palette
Every color here arrived with the makeover: the sofa, the rug, and the plants. The white walls and pale laminate were already in place and stayed untouched.
If you are weighing whether a restyle like this earns its keep, the case for hiring an online interior designer for your Airbnb is a separate piece, and I will leave the argument there.
Why I Skipped the Renovation
Because the room did not need one. Renovation buys new bones, and these bones were sound. What the room lacked was warmth, color, and evidence that somebody cared about it, and no new floor supplies that. In a short-term rental, what guests photograph, mention in reviews, and remember is rarely the shell. It is where they sat, what they touched, and how the room felt at night with the lamps on.
I will be honest about the other case too. If your rental needs walls moved, plumbing rerouted, or permits pulled, that is not a styling project and it is not an online one. Work like that wants an interior designer standing in the room with the contractor, and I say so whenever I see it. This apartment was the opposite: sound bones, no construction, a room that simply did not feel like anywhere. That is the project online interior design was built for, because furniture, textiles, and styling travel through a screen without losing a thing.
How to Start Your Own Airbnb Before and After
Start with your listing photos, not your room. Scroll them the way a guest would, fast and on a phone, and notice where your eye slides past without landing. That is where the room is invisible. Then declare the shell fixed: floors, walls, windows, and anything built in stays. Saying that out loud is what protects the budget.
From there, work in layers, statement piece first. Choose the sofa, or whichever piece will anchor the room's color, then let the rug, the lighting, the plants, and the textiles support it. Photograph as you go. The camera tells the truth about a room faster than your eyes will.
And if you would rather hand the puzzle to someone who does this for a living, it is exactly what I offer through online living room design: you send photos of the room as it stands, and I design what it becomes. When you are ready, book a consultation and show me your before. The rooms that look the most hopeless are the makeovers I enjoy most.
Frequently Asked Questions
Answers drawn from 2,000+ projects and real client conversations.